Thursday, August 16, 2018

YourPlumbersCrack Handyman Services!!!


Your Plumbers Crack is now offering a handy man service. Tell us what is on your Honey Do list? We can help.

We offer many services and Not all are listed here:

Install New Window Treatments
Replace Broken Switches
Repair Door Handles and Locks
Wash Windows
Install New Shower Heads
Childproof The House
Install Grab Bars
Replace Broken Outlet Covers
Install New Shelving
Replace Old Faucets
Install/ Replace Toilets
Install Lighting and Fans
Pressure Wash
Painting
Hang Pictures
Assembly of furniture, shelving, and miscellaneous item.

We charge $75 for the first hour and $40 for every hour after that. Plus materials if provided by our service.

Serving White, Putnam and Warren counties.

For Service and appointments Please CALL 931-212-2903.
+

Thursday, December 7, 2017

You and your new copper sink (bath or kitchen).

Your copper sink has a living finish meaning it is alive and will continually change. It is not a static finish and it NOT look the same from week to week or even day by day. If this is something you cannot handle, then perhaps a copper sink is not for you. Following is a guide for caring for your new sink.

Copper Care Guide:
Copper has a living surface so it will continually lighten and darken in time creating the beautiful rich patina you see now. Reason it does this is to protect itself from chemicals, anything acidic, or any other harsh elements. This natural process is what gives copper its anti-bacterial and anti-microbial properties. If you wipe a sink down with a soft cloth you will commonly see a bit of brown/patina come off on the cloth, this is normal. In addition, if anything acidic or chemical based is allowed to sit on the sink surface, the patina will be stripped and expose the raw copper. The copper will then do what it does best and start to protect itself or re-patina itself until it eventually reaches its equilibrium and matches the rest of the sink. How do you speed up this process? The more water and oxygen come into contact with the raw spot, the faster it will patina. Copper is constantly trying to stay at its equilibrium and will absolutely not stay in its raw state.

COPPER CARE AND CLEANING INSTRUCTIONS
DAILY
When you finish using your sink, adopt the simple method of “RINSE and WIPE”. When water dries, it often leaves behind unsightly calcium stains, which may alter the appearance in an undesirable way. In addition, when food is allowed to sit on the surface of the sink, any acids within the food can alter the finish. So just remember to rinse with water and wipe with a dish towel. NOTE: Since copper is a natural anti-bacterial surface, it is not necessary to disinfect or scrub your copper, it does it for you!

WHEN NEEDED
If you feel the surface has lost its luster, use a clear mild non-citrus liquid dish soap with a no-scratch sponge to gently scrub the entire surface. Rinse with water and wipe with a dish towel. NOTE: you may notice some brown spots on your sponge when you do this. Do not worry, it is perfectly normal. You are scrubbing off some of the patina that has built up over time.
To further enhance the beauty of the finish and add an extra layer of protection from food related acids, this is a good time to use Premier Copper Surface Protectant Bees Wax Spray (Model: W900-WAX). Simply spray and wipe with a soft cloth.

AVOID
All cleaning products that contain abrasives, ammonia, bleach, and alcohol. All will strip the patina and expose the raw copper.

CARING FOR LIGHT SPOTS
If something strips the patina, do not worry, your copper surface has a living finish. The patina will naturally regenerate with time. The best thing to do is clean the area with clear mild soap and no-scratch sponge to remove any remaining acid or chemical. Do not wax the sink until the spots have darkened back with natural patina. The more water and oxygen that come in contact with the raw spots, the faster they will patina. Waxing will slow the natural darkening process as it protects the surface from the environment. Use your sink as you normally would and you will notice the spots will darken and blend back into the sink.


Wednesday, May 3, 2017

HOW TO CLEAN A BATHROOM FAUCET CARTRIDGE

A leaking faucet or poorly working handles may be caused by a buildup of sediment(dirt) in the faucet cartridge. Here we tell you how to remove the cartridge and clear away buildup so your faucet runs correctly again.

If your bathroom sink faucet is leaking or the handles have stopped turning properly, it could be caused by a buildup of sediment and hard water deposits in the faucet cartridge.

In this blog, we're going to tell you how to clean the cartridge yourself, and get your faucet working smoothly again.

We’re going to need some tools for the job; an open-ended wrench, maybe an Allen wrench, a screw driver, a plastic bowl, a bucket of clean water, a towel, and maybe even an extra set of hands.
 

First, you'll need to shut off the water supply valves located under your sink. Turn the valves clockwise to close them. Then, turn on both your hot and cold water taps to drain any excess water from the faucet.

Once that's done, turn the handles back to the “off” position.

At this point, it’s a good idea to close or block the drain. This will keep any small parts from falling down your sink. Arrange a towel behind the faucet to soak up any water.

Now we're going to take off  the faucet handles.

Faucet handles can differ by model, but they're typically attached by a screw. If there's a decorative cap or button on the handle, you'll want to take that off first to get to the screw. If there's an escutcheon or other decorative trim, remove that as well.

Now, loosen the cartridge assembly with your wrench and remove it. (Lefty loosey/Righty tighty) Your faucet cartridge may look different than the one we have here, but the steps for cleaning them are essentially the same.


If you have an extra pair of hands to help you, now would be a good time to put them to use. Place the plastic bowl upside down over the faucet hole to direct water spray towards the drain. Have your extra set of hands turn on the hot water supply under the sink while you hold the bowl. Let the water run for 3 or 4 seconds.

This will flush out any debris trapped in the faucet or in the water line. Once this is done, turn the hot water supply off, then repeat the process for the cold water.

Now we’re going to rinse out the cartridges, placing them individually in the bucket of clean water.
Open and close the cartridges by twisting the stem. You may have to place the handle back on temporarily to move them.

Now reinsert the cartridges and reassemble the handles. It’s important not to over-tighten the cartridge assembly. Stop when you feel resistance, otherwise you could damage the faucet.

If your faucet handles are working in reverse, you've probably placed the cartridges on the wrong sides. Simply take them back out and switch them.

Now reopen the supply valves under the sink and slowly turn on your taps. Check for any leaks and make sure the water runs smoothly.

Helpful tips home tips from us to you!! Remember to come see us Tuesday through Saturday from 9 am until 5 pm CST. We are located at 6877 Spencer Hwy, Sparta TN 38583.

Friday, April 7, 2017

Showroom Remodel Step 3..... The Foyer Floor

In order to go ahead with our showroom remodel, we needed a new foyer floor. Something with impact and breathtaking!!!!

So we decided, after much debate and careful consideration of our alternatives, to go with a water based concrete stain. This meant tearing up the ceramic tile that was here originally.

Tools for tile tear up

Tile demo hammer
Sledge hammer
chisel
safety goggles
gloves
trash can
flat blade shovel
band-aids
shop vac
time

In order to tear up tile, you need a removal method. We chose a tile demo hammer. This was a rental item. We rent from a local place near our showroom.

The ceramic tile was put down with toughest stinky mess ever created and then it got old. The demo hammer was employed for about an hour of work. Then the hard part part began....thin set removal (or whatever that evil stuff was).
This stuff did NOT want to come up. It was old and cranky. We tried multiple methods of removal..vinyl adhesive remover, various chemicals. Then we went back to the rental place and got a 17" rotating floor buffer with a diamond grinder and sand paper with several different grit levels (80 and 100).

Then back to the showroom. We put the sander to work. Little circles, little circles and slowly it comes off. Much blood, sweat, tears, and band-aids later, we are down to bare concrete. Then we had to clean up the mess. Employ the shop vac.

Ready for round 2....


Thursday, March 23, 2017

How to Etch and Age Sheet Metal... (For Crafty Purposes)...

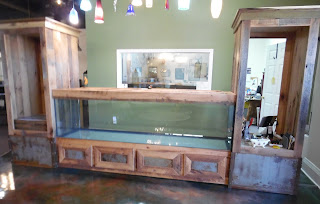
As you know, we are getting a new counter for the showroom as part of our remodel. We will be incorporating both aged barn wood and metal in this counter, as well as a center placed 250 gallon freshwater fish tank. The barn wood portion of the counter will be provided by Barn To Be, a small company that remakes old barns into family heirlooms. Mr. Jeremy Virtue is the proprietor.

In order for the sheet metal we chose to match the aged barn wood, we decided to help it along. The sheet metal was purchased from our local welder. It has protective coating to prevent major rusting and corrosion. In order to age the metal to match the barn wood, steps had to be taken.


Here is our process for aging the sheet metal....

Materials Needed:

Sheet Metal
Utility Broom
Water Hose
Muriatic Acid            -Purchase from any hardware store or pool place
Hydrogen Peroxide   -purchase from basically anywhere
Salt                            -Regular plain salt purchased from anywhere
Large Spray Bottle    -purchased from hardware store

Step 1.... You will need to pour the muriatic acid onto the sheet metal. This will need to sit for at least 6 hours. This gives the acid the time to take off the protective coating and pits any weak places in the metal. (This is what will make the most reaction for step 4)

Step 2....Waiting, waiting, Waiting (boring, boring, boring but worth it) Try an activity to keep your spirits up.

Step 3...Removing the muriatic acid

When your 6 hours are up, wash the acid off with a hose and scrub with a utility brush to remove any traces of acid. Let dry.


Step 4... Mixing your peroxide and salt

Step 4 requires a place outside where your sheet metal can be left alone to do its thing.

You will need to use a large spray bottle. Pour 1/2 cup (4 ounces) of plain table salt into your spray bottle. Then add 4 cups of peroxide to the salt. Shake to mix. Spray liberally on to metal. Repeat spray portion whenever the mixture dries. Leave for at least 12 hours or longer depending on the aging reaction you require. More time=more rust. We chose a 12 hour wait.


Step 5.... Waiting, waiting, Waiting (boring, boring, boring but again worth it)

Plan activities that will keep your mind off your metal project. Checking on it will NOT help it age faster. Try twiddling your thumbs, counting sheep, cleaning house, watching t.v. or napping.

Step 6....Removing the salt/peroxide mixture...

When your time is up, again wash the mix off with the hose and scrub with utility brush to remove any extra mixture. Let dry.


Your sheet metal is ready to rock... Or in our case ready to be attached to the barn wood fish tank counter....


Tuesday, March 21, 2017

Showroom Remodel Step 2........

We tear down the counter. Easy peasy lemon squeezy.

Materials required. A crow bar, a drywall knife, screw drivers (both a Phillips and a flat head)  and Dean. (IF you do not have a Dean, another person maybe substituted.)

We used the dry wall knife to cut away all the drywall and to cut it loose from the wall holding it up. Break the counter top off with a few well placed blows from the back of the crow bar. Out the door. (Where we will recycle it).

Dean

We will reuse all the 2 x 4's for other projects. The claw end of the crow bar was employed to pry loose the concrete nails holding the base to the floor. The nail holes left behind will be covered by the new counter. Time elapsed 45 minutes.

On to our next adventure!!!!