Thursday, March 23, 2017

How to Etch and Age Sheet Metal... (For Crafty Purposes)...

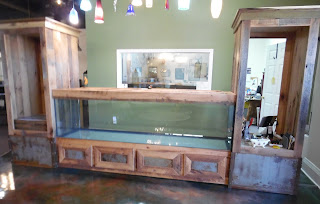
As you know, we are getting a new counter for the showroom as part of our remodel. We will be incorporating both aged barn wood and metal in this counter, as well as a center placed 250 gallon freshwater fish tank. The barn wood portion of the counter will be provided by Barn To Be, a small company that remakes old barns into family heirlooms. Mr. Jeremy Virtue is the proprietor.

In order for the sheet metal we chose to match the aged barn wood, we decided to help it along. The sheet metal was purchased from our local welder. It has protective coating to prevent major rusting and corrosion. In order to age the metal to match the barn wood, steps had to be taken.


Here is our process for aging the sheet metal....

Materials Needed:

Sheet Metal
Utility Broom
Water Hose
Muriatic Acid            -Purchase from any hardware store or pool place
Hydrogen Peroxide   -purchase from basically anywhere
Salt                            -Regular plain salt purchased from anywhere
Large Spray Bottle    -purchased from hardware store

Step 1.... You will need to pour the muriatic acid onto the sheet metal. This will need to sit for at least 6 hours. This gives the acid the time to take off the protective coating and pits any weak places in the metal. (This is what will make the most reaction for step 4)

Step 2....Waiting, waiting, Waiting (boring, boring, boring but worth it) Try an activity to keep your spirits up.

Step 3...Removing the muriatic acid

When your 6 hours are up, wash the acid off with a hose and scrub with a utility brush to remove any traces of acid. Let dry.


Step 4... Mixing your peroxide and salt

Step 4 requires a place outside where your sheet metal can be left alone to do its thing.

You will need to use a large spray bottle. Pour 1/2 cup (4 ounces) of plain table salt into your spray bottle. Then add 4 cups of peroxide to the salt. Shake to mix. Spray liberally on to metal. Repeat spray portion whenever the mixture dries. Leave for at least 12 hours or longer depending on the aging reaction you require. More time=more rust. We chose a 12 hour wait.


Step 5.... Waiting, waiting, Waiting (boring, boring, boring but again worth it)

Plan activities that will keep your mind off your metal project. Checking on it will NOT help it age faster. Try twiddling your thumbs, counting sheep, cleaning house, watching t.v. or napping.

Step 6....Removing the salt/peroxide mixture...

When your time is up, again wash the mix off with the hose and scrub with utility brush to remove any extra mixture. Let dry.


Your sheet metal is ready to rock... Or in our case ready to be attached to the barn wood fish tank counter....


Tuesday, March 21, 2017

Showroom Remodel Step 2........

We tear down the counter. Easy peasy lemon squeezy.

Materials required. A crow bar, a drywall knife, screw drivers (both a Phillips and a flat head)  and Dean. (IF you do not have a Dean, another person maybe substituted.)

We used the dry wall knife to cut away all the drywall and to cut it loose from the wall holding it up. Break the counter top off with a few well placed blows from the back of the crow bar. Out the door. (Where we will recycle it).

Dean

We will reuse all the 2 x 4's for other projects. The claw end of the crow bar was employed to pry loose the concrete nails holding the base to the floor. The nail holes left behind will be covered by the new counter. Time elapsed 45 minutes.

On to our next adventure!!!!

Friday, March 17, 2017

We have begun our showroom Remodel.....

We started with baby steps..

Painting the outside of the office. Green is our favorite color and so won the color race with ease.

Once the color was settled, a trip the our neighborhood hardware store was required. Then came the hard part.... (hear the scary shark movie music inside your mind)...Deciding on the perfect shade of green.

Do you know how many shades of green there are and how many you can make by adding little bits of other colors??? Well do you??

The number is infinite. Finally after long debate a shade of green was chosen. This shade was applied to the office wall and peace reigned in the showroom....for a little while.


Wednesday, March 15, 2017

Yourplumberscrack Remodels the Showroom.

We are in the process of remodeling our showroom. I thought maybe you would like to take a walk through the process with me.

We will share pictures and our thoughts about this process as we go along. Bear with us as this has been a lengthy process. We will share the tricks we have learned while tearing down counters, ripping up carpet and tile, adding the stain to the exposed cement and painting the walls.


Showroom Today....


Tuesday, March 14, 2017

How to add a Faux Brick Accent Wall to Any Room....

How to Faux Brick an Accent Wall....

    We wanted to create an interesting accent wall in our living room. We decided on a white washed faux brick wall, because who can afford a brick mason?

    Multiple stores were consulted before we went with DPI embossed red brick hardboard wall panels Model #288 from Lowe's.


Materials/Tools Need:

Panels
Drywall Screws
Drill
Jig Saw
Drywall Mud
Drywall Knife
Sanding sponge
Mouse Sander
Paint rollers
Caulk
Black grout
white paint
plaster of Paris
water

     We purchased 6 of these boards at a total cost of $185. Panel size: 8 ft by 4 ft. We chose to attach the panels to the wall with drywall screws instead of the liquid nail adhesive suggested by manufacturer. Liquid nail is a semi-permanent substance (by that I mean that if you use it on drywall and then decide later you would like to change it, tearing the panels off the liquid nails will destroy your drywall.) So we chose screws.

     Having decided to do the whole wall, we notched the half bricks out so that our wall would fit closer together. To do this we used a jig saw for the cutting work. You will need to be careful when cutting the boards as they can tear if you move too fast. (IF we ever do this again we will not cut the half bricks but use a different method more like drywall finishing.)


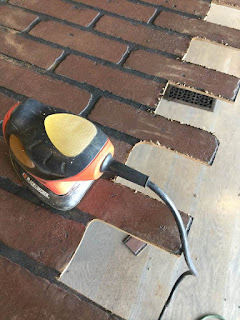
     After cutting, we used either a sandpaper sponge or the mouse sander to soften the edges. We tried to leave the faux mortar in some of the bricks. This did NOT work out. The cut edges just would not fit together. So we had to go back and re cut to remove the mortar.

      We also trimmed the boards to fit the edges of our wall and ceilings. Our wall peaked in the center of our ceiling so our first board had a triangular top edge.

    Keep those trim cuttings, you will need them to piece out the edges of your wall. Our second piece had more slanted edge to go along our wall as the ceiling sloped down.
We used drywall mud to fill in the gap between the notched edges. And to fill in the screw holes. (See photo...
We placed all 6 boards on the wall and used the trimmed pieces to fill in the bottom (as you can see in the very 1st picture the wall is taller than the board). The master bedroom door is also on this wall. Cut pieces were used to fill in around that as well. Make sure all pieces are flush to the wall.

Step 2 Chalk Paint

Make your wash for staining the bricks. (If you do not want to change the color of the bricks skip this step). We wanted the bricks to have a aged look to them, so we used a white wash. Here is our recipe.

Chalk Paint:
2 Cups of water
2 cups of white paint (any brand)
1/4 cup of plaster of Paris

We mixed this together in a bucket. It does not matter if the paint mix is clumpy, just call the thicker portions "texture". We used a scraper to add drywall mud to random bricks. 

We used black grout and caulk to fill in the joint between our boards.
 This made for a more realistic looking wall.
 Real looking yes?


Now for the white washing. We used paint rollers and pans. Go to it and roll on that white wash...

We coated the whole wall one time and then went back over it with dry rollers. We let that dry...
After drying you may need to go back and touch up some of your grout lines and any screw holes you have. We did.
Then another coat of white wash. Remember to go over it with dry rollers after.
TA DA!!!!!! Amazing what a little work can accomplish!!