How to Faux Brick an Accent Wall....
We wanted to create an interesting accent wall in our living room. We decided on a white washed faux brick wall, because who can afford a brick mason?
Multiple stores were consulted before we went with DPI embossed red brick hardboard wall panels Model #288 from Lowe's.
Materials/Tools Need:
Panels
Drywall Screws
Drill
Jig Saw
Drywall Mud
Drywall Knife
Sanding sponge
Mouse Sander
Paint rollers
Caulk
Black grout
white paint
plaster of Paris
water
We purchased 6 of these boards at a total cost of $185. Panel size: 8 ft by 4 ft. We chose to attach the panels to the wall with drywall screws instead of the liquid nail adhesive suggested by manufacturer. Liquid nail is a semi-permanent substance (by that I mean that if you use it on drywall and then decide later you would like to change it, tearing the panels off the liquid nails will destroy your drywall.) So we chose screws.
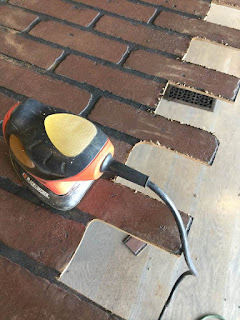
Having decided to do the whole wall, we notched the half bricks out so that our wall would fit closer together. To do this we used a jig saw for the cutting work. You will need to be careful when cutting the boards as they can tear if you move too fast. (IF we ever do this again we will not cut the half bricks but use a different method more like drywall finishing.)
After cutting, we used either a sandpaper sponge or the mouse sander to soften the edges. We tried to leave the faux mortar in some of the bricks. This did NOT work out. The cut edges just would not fit together. So we had to go back and re cut to remove the mortar.
We also trimmed the boards to fit the edges of our wall and ceilings. Our wall peaked in the center of our ceiling so our first board had a triangular top edge.
We used drywall mud to fill in the gap between the notched edges. And to fill in the screw holes. (See photo...
This made for a more realistic looking wall.
We placed all 6 boards on the wall and used the trimmed pieces to fill in the bottom (as you can see in the very 1st picture the wall is taller than the board). The master bedroom door is also on this wall. Cut pieces were used to fill in around that as well. Make sure all pieces are flush to the wall.
Step 2 Chalk Paint
Make your wash for staining the bricks. (If you do not want to change the color of the bricks skip this step). We wanted the bricks to have a aged look to them, so we used a white wash. Here is our recipe.
Chalk Paint:
2 Cups of water
2 cups of white paint (any brand)
1/4 cup of plaster of Paris
We mixed this together in a bucket. It does not matter if the paint mix is clumpy, just call the thicker portions "texture". We used a scraper to add drywall mud to random bricks.
We used black grout and caulk to fill in the joint between our boards.
Now for the white washing. We used paint rollers and pans. Go to it and roll on that white wash...
We coated the whole wall one time and then went back over it with dry rollers. We let that dry...
After drying you may need to go back and touch up some of your grout lines and any screw holes you have. We did.
Then another coat of white wash. Remember to go over it with dry rollers after.
TA DA!!!!!! Amazing what a little work can accomplish!!


Awesome!!!
ReplyDelete